Cheat Sheet : Azure Logic Apps
An excellent tool for creating workflows to combine internal and external services.

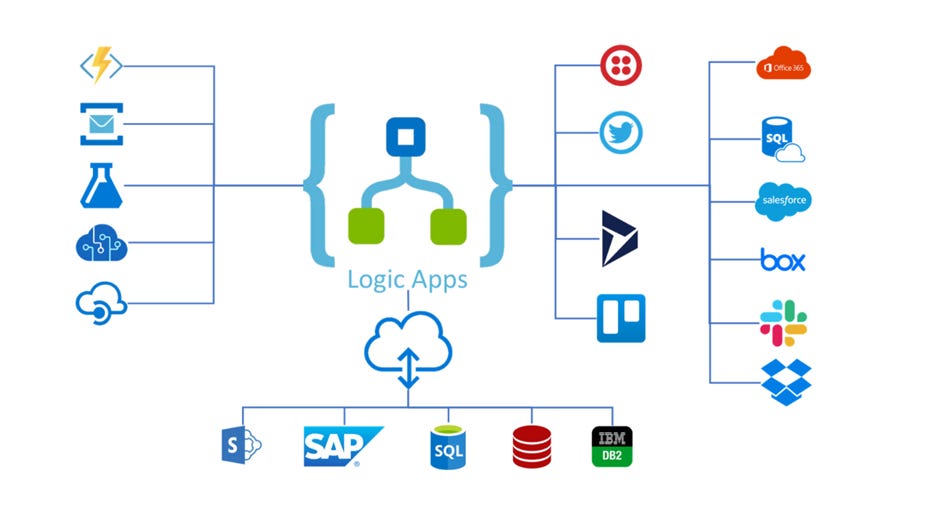
What are Azure Logic Apps?
Azure Logic Apps is a cloud service that helps automate workflows and integrate apps, data, and services. It’s designed for building workflows that connect your apps and data to automate business processes with minimal code.
Why Use Azure Logic Apps?
No Code/Low Code: You can create workflows without writing complex code, using a visual designer.
Integration with Azure Services: Easily integrates with many Azure services like Azure Functions, Azure Storage, and more.
Connects with Third-Party Services: Supports integration with many SaaS apps, like Office 365, Salesforce, etc.
Event-driven Automation: Trigger actions based on external events like database changes, user actions, etc.
Scalable: Easily scales without worrying about infrastructure.
Advantages of Azure Logic Apps
Ease of Use: No coding or minimal coding required. You can create workflows with a visual designer.
Pre-built Connectors: It has hundreds of connectors to integrate with various systems like SQL, SharePoint, Salesforce, and more.
Cost-effective: Pay only for what you use with consumption-based pricing.
Fully Managed: Azure handles all infrastructure, scaling, and maintenance.
Event-driven: Can trigger workflows based on events, reducing the need for polling and improving efficiency.
Monitoring and Logging: Built-in monitoring tools in the Azure portal to track the status and performance of workflows.
Disadvantages of Azure Logic Apps
Limited Customization: For highly complex workflows, Logic Apps might not be as flexible as writing custom code.
Cold Start Latency: If the Logic App has been idle, it can experience cold start latency.
Limited Control over Execution: Since Logic Apps are fully managed, you may face limitations in some advanced configurations.
Pricing Complexity: Although it's consumption-based, cost estimates can get tricky as different connectors and executions have varied pricing.
Setting Up a Simple Logic App
Create a Logic App in Azure Portal:
Go to the Azure Portal.
Click Create a resource > Logic App.
Name your Logic App, select a resource group, and region.
Click Create.
Create a Trigger:
Once the Logic App is created, open it and go to the Logic App Designer.
Select a Trigger for your logic app. For example, you can select When a new email arrives (for Office 365).
Add Actions:
After the trigger, add actions based on your requirements. For example, you can choose to Send an email or Insert into a database.
Save and Test:
Save your Logic App and test by triggering the defined event.
Trigger Types in Azure Logic Apps
Triggers are the events that start a workflow. Here are common types of triggers:
Recurrence Trigger: Runs at a scheduled interval (e.g., every hour).
HTTP Trigger: Invoked via an HTTP request, commonly used in APIs.
Event-based Trigger: Activated by an event such as new data in a database or a message in a queue.
Webhook Trigger: Activated by an incoming webhook call from an external system.
Azure Event Grid Trigger: Triggered by Azure Event Grid events.
Manual Trigger: Triggered manually via the Logic Apps portal or an API call.
Service Bus Queue Trigger: Triggered when a message arrives in an Azure Service Bus queue.
Blob Storage Trigger: Triggered when a new file is added to Azure Blob Storage.
Best Practices for Azure Logic Apps
Use Variables: Use variables to store reusable data throughout the workflow. This reduces redundancy and improves maintainability.
Design for Failure Handling: Always design your workflows to handle failures, retries, and exceptions.
Optimize for Performance: Minimize the number of actions in your workflow. Use batching and parallel processing where applicable.
Use Expressions: Azure Logic Apps has a powerful expression language that allows you to manipulate data dynamically. Use it to clean and transform data.
Monitor and Logging: Leverage built-in monitoring and logging to track the health of your workflows and troubleshoot issues.
Use Conditions and Loops: Use conditions and loops to create more flexible workflows that can handle different scenarios.
Additional Links for Self-Study